Applying for a Dedicated WAF Instance
If your service servers are deployed on the cloud, you can buy dedicated WAF instances (or dedicated WAF engines) to protect important websites through domain names or to protect web applications with only IP addresses.
Prerequisites
You have obtained management console login credentials for an account with the WAF Administrator and WAF FullAccess permissions.
A VPC is available.
Resource sets have been created.
Before You Start
After your application for a dedicated WAF instance succeeds, its specifications cannot be modified.
Important
It takes about 10 minutes to create a dedicated WAF instance. If the instance is in the Running status, the instance has been created successfully.
Procedure
Log in to the management console.
Click
 in the upper left corner of the management console and select a region or project.
Click
 in the upper left corner and choose Web Application Firewall (Dedicated) under Security.
In the upper right corner of the page, click Apply for Dedicated Engine.
(Optional): Select an enterprise project from the Enterprise Project drop-down list.
This option is only available if you are logged in using an enterprise account, or if you have enabled enterprise projects. You can use enterprise projects to more efficiently manage cloud resources and project members.
Note
default: indicates the default enterprise project. Resources that are not allocated to any enterprise projects under your account are listed in the default enterprise project.
Configure instance parameters by referring to Table 1. Figure 1 shows an example.
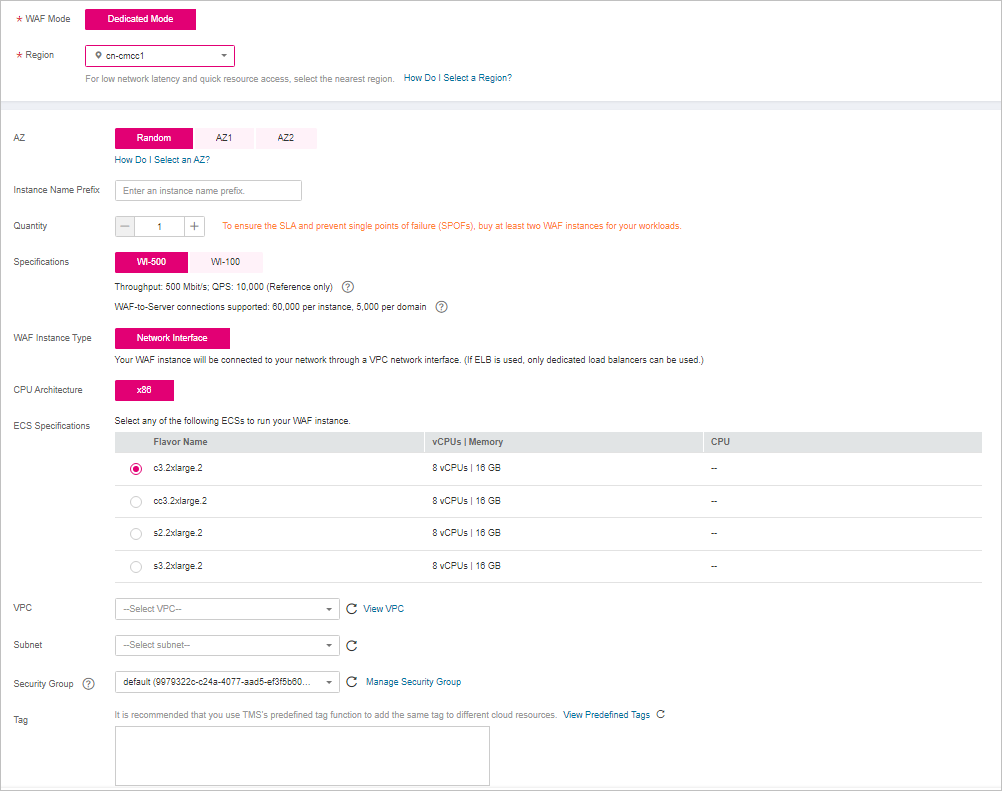
Figure 1 Configuring a dedicated WAF instance
Table 1 Parameters of a dedicated WAF instance¶ Parameter
Description
WAF Mode
Dedicated Mode
Region
Generally, a WAF instance you apply for in any region can protect web services in all regions. To make a WAF instance forward your website traffic faster, select the region nearest to your services.
AZ
Select an AZ in the selected region.
Instance Name Prefix
Set a prefix of the dedicated WAF instance name. If you apply for multiple instances at a time, the prefix to each instance name is the same.
Quantity
Set the number of WAF instances you want to apply for.
Specifications
Select specifications for your instance. WAF offers two types of specifications, 500 Mbit/s and 100 Mbit/s.
WAF Instance Type
Your WAF instance will be connected to your network through a VPC network interface. (If ELB is used, only dedicated load balancers can be used.)
CPU Architecture
Select CPU architecture for your instance.
ECS Specifications
Select ECS specifications for your instance.
VPC
Select the VPC to which the origin server belongs.
Subnet
Select a subnet configured in the VPC.
Security Group
Select a security group in the region or click Manage Security Group to go to the VPC console and create a security group. After you select a security group, the WAF instance will be protected by the access rules of the security group.
Important
NOTICE:
You can configure your security group as follows:
Inbound rules
Add an inbound rule to allow incoming network traffic to pass through over a specified port based on your service requirements. For example, if you want to allow access from port 80, you can add a rule that allows TCP and port 80.
Outbound rules
The value is Default. All outgoing network traffic is allowed by default.
If your dedicated WAF instance and origin server are not in the same VPC, enable communications between the instance and the subnet of the origin server in the security group.
Tag
It is recommended that you use TMS's predefined tag function to add the same tag to different cloud resources.
In the lower right corner of the page, click Create Now.
Confirm the configuration and click Create Now.
Click Back to Dedicated Engine List. On the Dedicated Engine page, view the instance status.
It takes about 10 minutes to create a dedicated WAF instance. If the instance is in the Running status, the instance has been created.