Using Spark Jar Jobs to Read and Query OBS Data
Scenario
DLI is fully compatible with open-source Apache Spark and allows you to import, query, analyze, and process job data by programming. This section describes how to write a Spark program to read and query OBS data, compile and package the code, and submit it to a Spark Jar job.
Environment Preparations
Before you start, set up the development environment.
Item | Description |
|---|---|
OS | Windows 7 or later |
JDK | JDK 1.8. |
IntelliJ IDEA | This tool is used for application development. The version of the tool must be 2019.1 or other compatible versions. |
Maven | Basic configurations of the development environment. Maven is used for project management throughout the lifecycle of software development. |
Development Process
The following figure shows the process of developing a Spark Jar job.

Figure 1 Development process
No. | Phase | Software Portal | Description |
|---|---|---|---|
1 | Create a queue for general use. | DLI console | The DLI queue is created for running your job. |
2 | Upload data to an OBS bucket. | OBS console | The test data needs to be uploaded to your OBS bucket. |
3 | Create a Maven project and configure the POM file. | IntelliJ IDEA | Write your code by referring to the sample code for reading data from OBS. |
4 | Write code. | ||
5 | Debug, compile, and pack the code into a Jar package. | ||
6 | Upload the Jar package to OBS and DLI. | OBS console | You can upload the generated Spark JAR package to an OBS directory and DLI program package. |
7 | Create a Spark Jar Job. | DLI console | The Spark Jar job is created and submitted on the DLI console. |
8 | Check execution result of the job. | DLI console | You can view the job running status and run logs. |
Step 1: Create a Queue for General Purpose
If you submit a Spark job for the first time, you need to create a queue first. For example, create a queue, name it sparktest, and set Queue Usage to For general purpose.
In the navigation pane of the DLI management console, choose Queue Management.
In the upper right corner of the Queue Management page, click Create Queue to create a queue.
Create a queue, name it sparktest, and set the queue usage to for general purpose. For details about how to create a queue, see Creating a Queue.
Click Create Now to create a queue.
Step 2: Upload Data to OBS
Create the people.json file containing the following content:
{"name":"Michael"}
{"name":"Andy", "age":30}
{"name":"Justin", "age":19}
Log in to the OBS Console. In the Bucket page, click the name of the created OBS bucket. In this example, the bucket name is dli-test-obs01. The overview page is displayed.
In the navigation pane on the left, choose Objects. Click Upload Object to upload the file to the root directory of the OBS bucket.
In the root directory of the OBS bucket, click Create Folder to create a folder and name it result.
Click the result folder, click Create Folder on the displayed page to create a folder and name it parquet.
Step 3: Create a Maven Project and Configure the pom Dependency
This step uses IntelliJ IDEA 2020.2 as an example.
Start IntelliJ IDEA and choose File > New > Project.
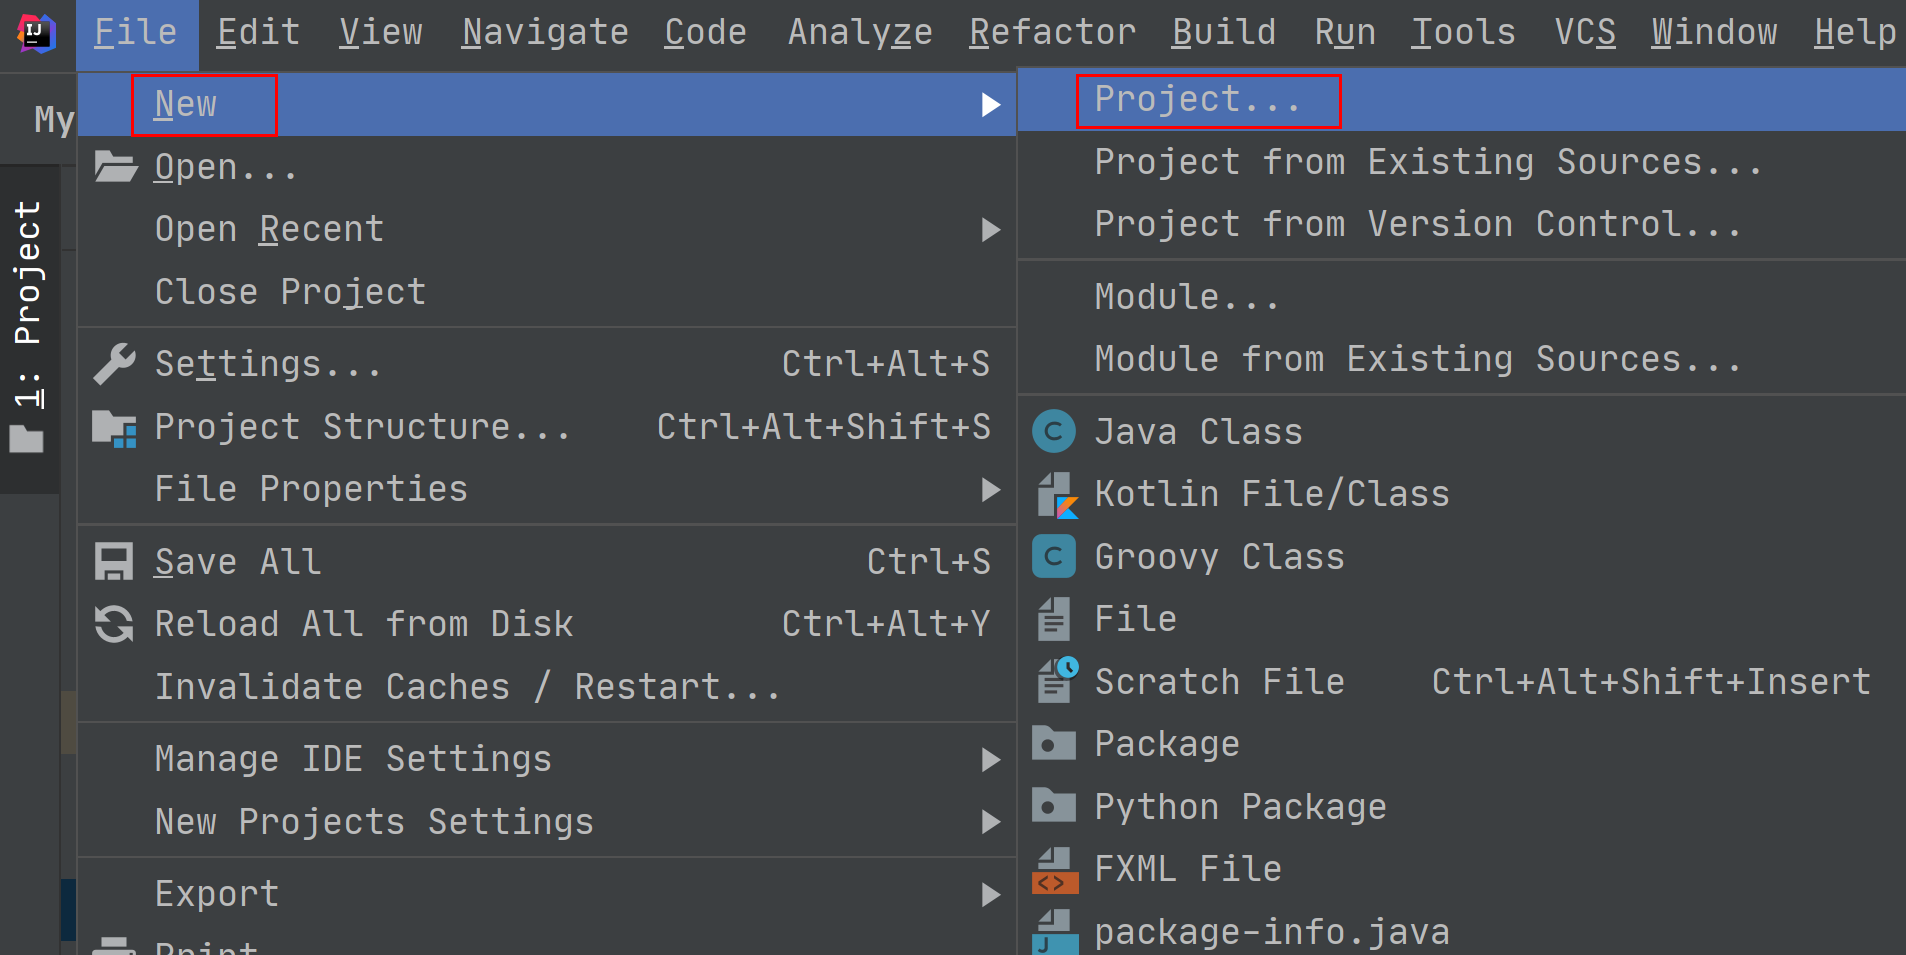
Figure 2 Creating a project
Choose Maven, set Project SDK to 1.8, and click Next.
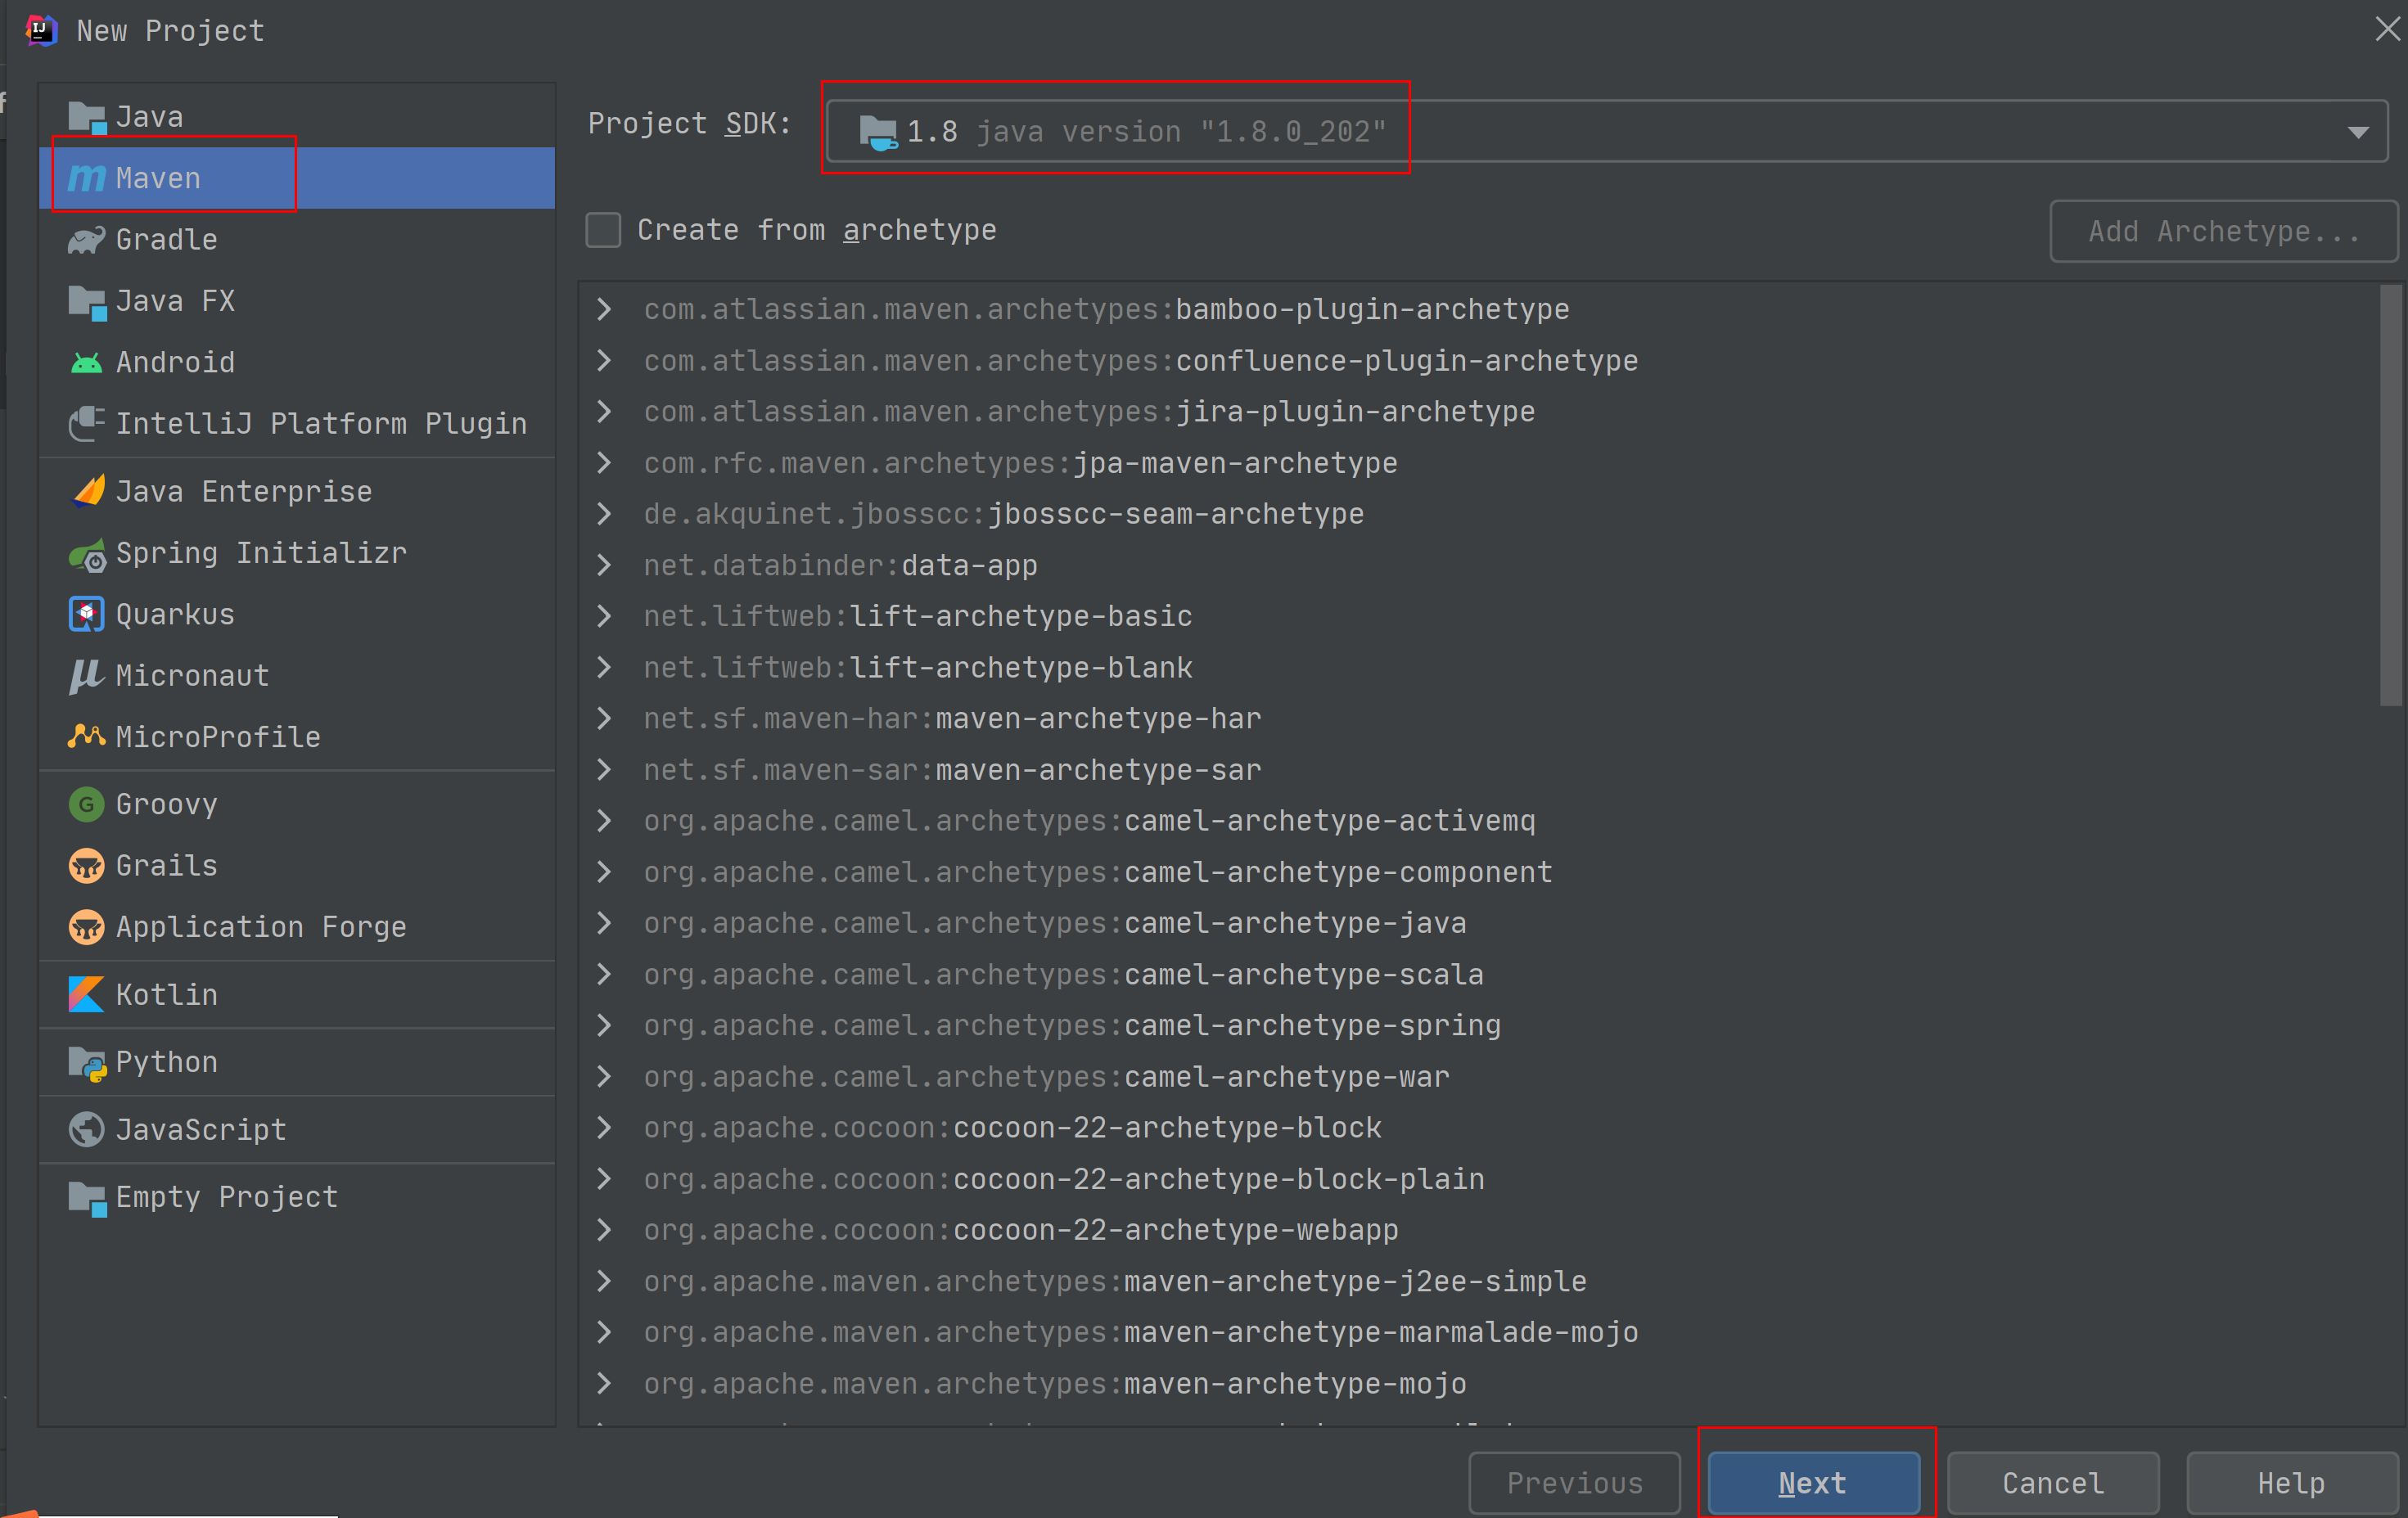
Figure 3 Creating a project
Set the project name, configure the storage path, and click Finish.
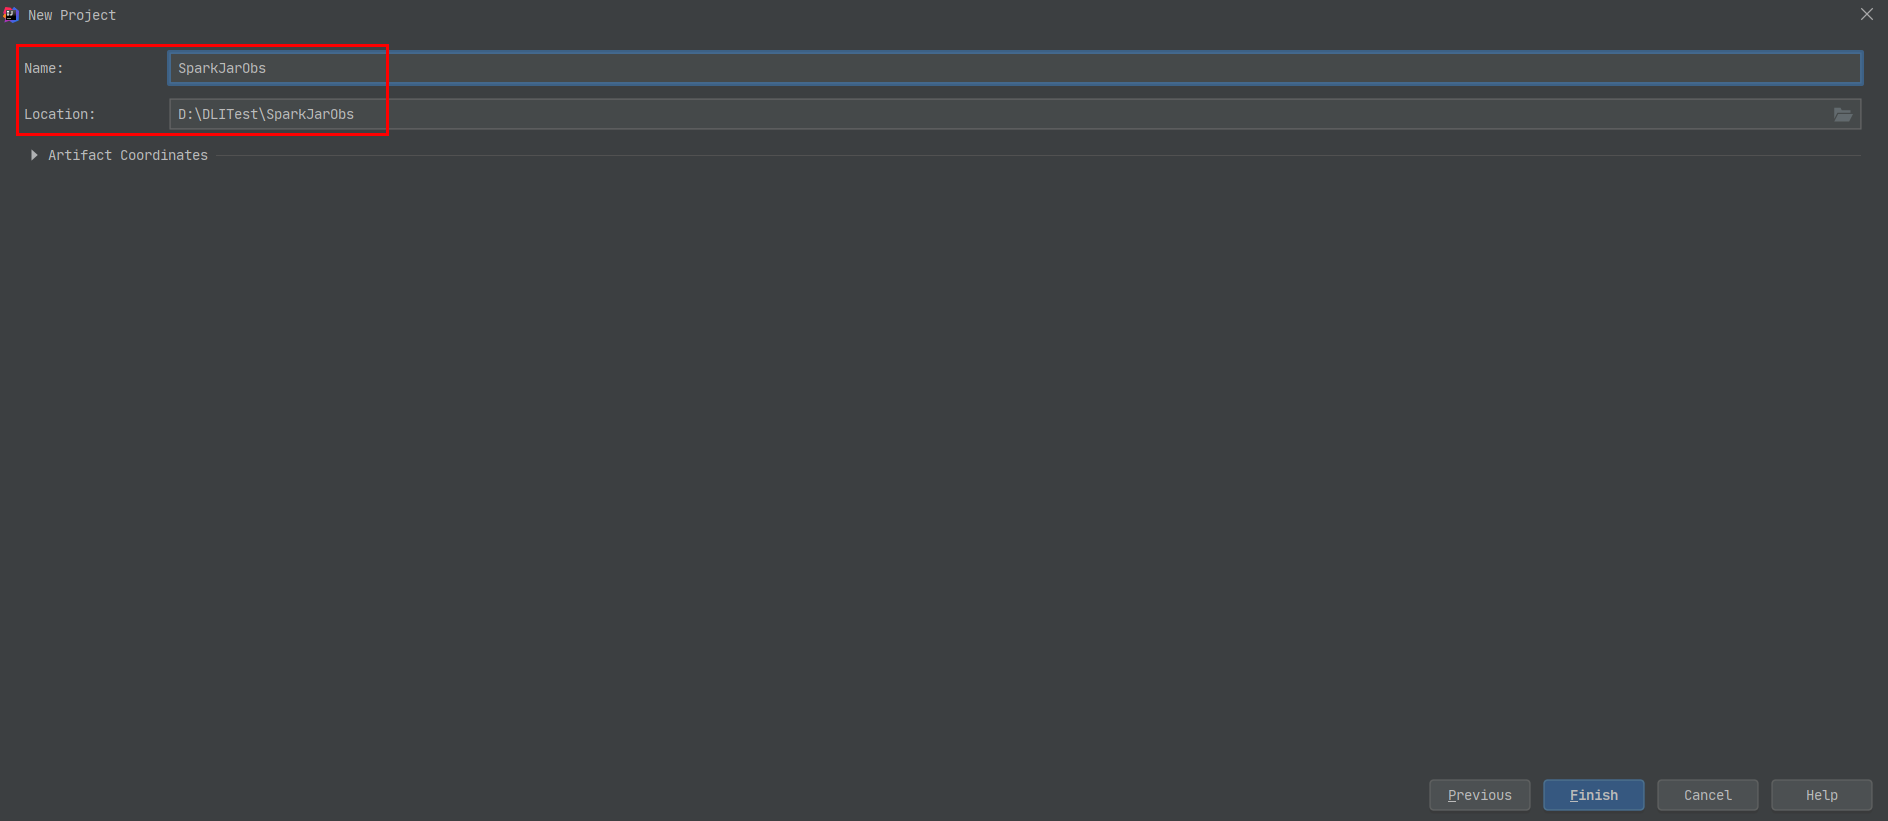
Figure 4 Creating a project
In this example, the Maven project name is SparkJarObs, and the project storage path is D:\DLITest\SparkJarObs.
Add the following content to the pom.xml file.
<dependencies>
        <dependency>
            <groupId>org.apache.spark</groupId>
            <artifactId>spark-sql_2.11</artifactId>
            <version>2.3.2</version>
        </dependency>
</dependencies>
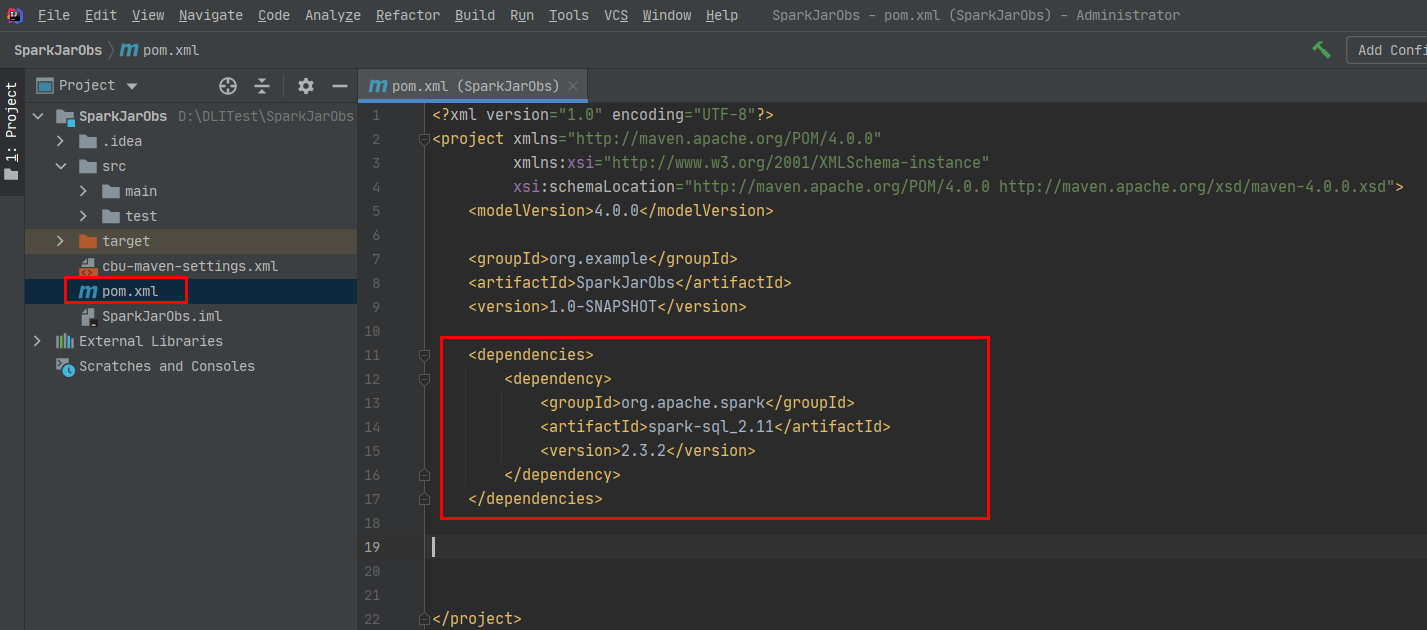
Figure 5 Modifying the pom.xml file
Choose src > main and right-click the java folder. Choose New > Package to create a package and a class file.
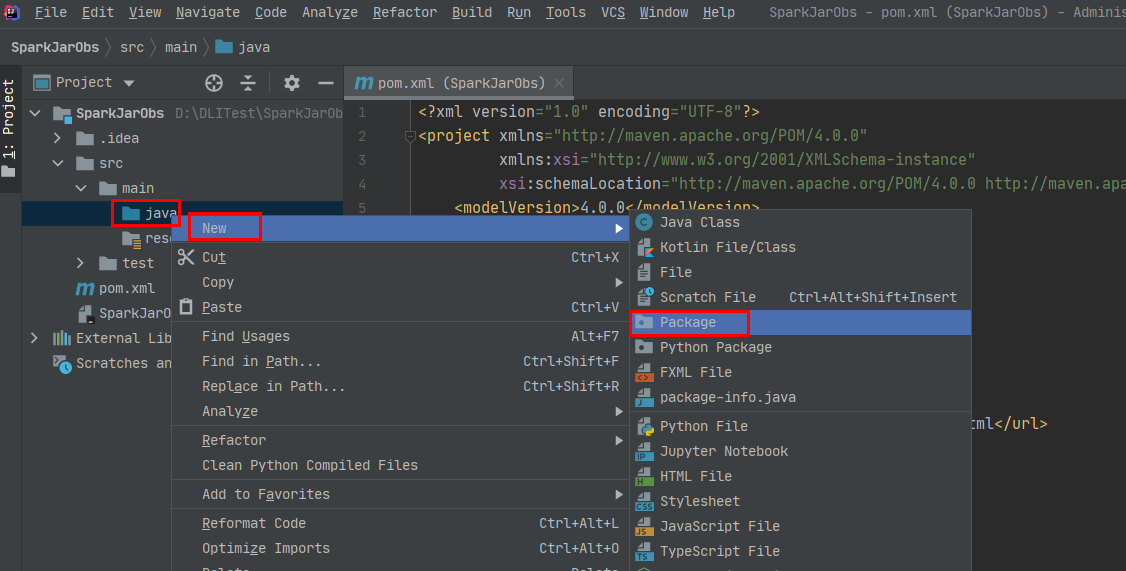
Figure 6 Creating a package
Set the package name as you need. Then, press Enter.
Create a Java Class file in the package path. In this example, the Java Class file is SparkDemoObs.
Step 4: Write Code
Code the SparkDemoObs program to read the people.json file from the OBS bucket, create the temporary table people, and query data.
For the sample code, see Sample Code.
Import dependencies.
import org.apache.spark.sql.Dataset;
import org.apache.spark.sql.Row;
import org.apache.spark.sql.SaveMode;
import org.apache.spark.sql.SparkSession;

import static org.apache.spark.sql.functions.col;
Create Spark session spark using the AK and SK of the current account.
SparkSession spark = SparkSession
                .builder()
                .config("spark.hadoop.fs.obs.access.key", "xxx")
                .config("spark.hadoop.fs.obs.secret.key", "yyy")
                .appName("java_spark_demo")
                .getOrCreate();
Replace xxx of "spark.hadoop.fs.obs.access.key" with the AK of the account.
Replace yyy of "spark.hadoop.fs.obs.secret.key" with the SK of the account.
Read the people.json file from the OBS bucket.
dli-test-obs01 is the name of the sample OBS bucket. Replace it with the actual OBS bucket name.
Dataset<Row> df = spark.read().json("obs://dli-test-obs01/people.json");
df.printSchema();
Create temporary table people to read data.
df.createOrReplaceTempView("people");
Query data in the people table.
Dataset<Row> sqlDF = spark.sql("SELECT * FROM people");
sqlDF.show();
Export people table data in Parquet format to the result/parquet directory of the OBS bucket.
sqlDF.write().mode(SaveMode.Overwrite).parquet("obs://dli-test-obs01/result/parquet");
spark.read().parquet("obs://dli-test-obs01/result/parquet").show();
Disable the spark session.
spark.stop();
Step 5: Debug, compile, and pack the code into a JAR package.
Double-click Maven in the tool bar on the right, and double-click clean and compile to compile the code.
After the compilation is successful, double-click package.
The generated JAR package is stored in the target directory. In this example, SparkJarObs-1.0-SNAPSHOT.jar is stored in D:\DLITest\SparkJarObs\target.
Step 6: Upload the JAR Package to OBS and DLI
Spark 3.3 or later:
You can only set the Application parameter when creating a Spark job and select the required JAR file from OBS.
Log in to the OBS console and upload the SparkJarObs-1.0-SNAPSHOT.jar file to the OBS path.
Log in to the DLI console. In the navigation pane, choose Job Management > Spark Jobs.
Locate the row containing a desired job and click Edit in the Operation column.
Set Application to the OBS path in 1.
Versions earlier than Spark 3.3:
Upload the JAR file to OBS and DLI.
Log in to the OBS console and upload the SparkJarObs-1.0-SNAPSHOT.jar file to the OBS path.
Upload the file to DLI for package management.
Log in to the DLI management console and choose Data Management > Package Management.
On the Package Management page, click Create in the upper right corner.
In the Create Package dialog, set the following parameters:
Type: Select JAR.
OBS Path: Specify the OBS path for storing the package.
Set Group and Group Name as required for package identification and management.
Click OK.
Step 7: Create a Spark Jar Job
Log in to the DLI console. In the navigation pane, choose Job Management > Spark Jobs.
On the Spark Jobs page, click Create Job.
On the displayed page, configure the following parameters:
Queue: Select the created queue. For example, select the queue sparktest created in Step 1: Create a Queue for General Purpose.
Select a supported Spark version from the drop-down list. The latest version is recommended.
Job Name (--name): Name of the Spark Jar job. For example, SparkTestObs.
Application: Select the package uploaded in Step 6: Upload the JAR Package to OBS and DLI. For example, select SparkJarObs-1.0-SNAPSHOT.jar.
Main Class (--class): The format is program package name + class name.
You do not need to set other parameters.
Click Execute to submit the Spark Jar job. On the Job management page, view the running status.
Step 8: View Job Execution Result
On the Job management page, view the running status. The initial status is Starting.
If the job is successfully executed, the job status is Finished. Click More in the Operation column and select Driver Logs to view the running log.
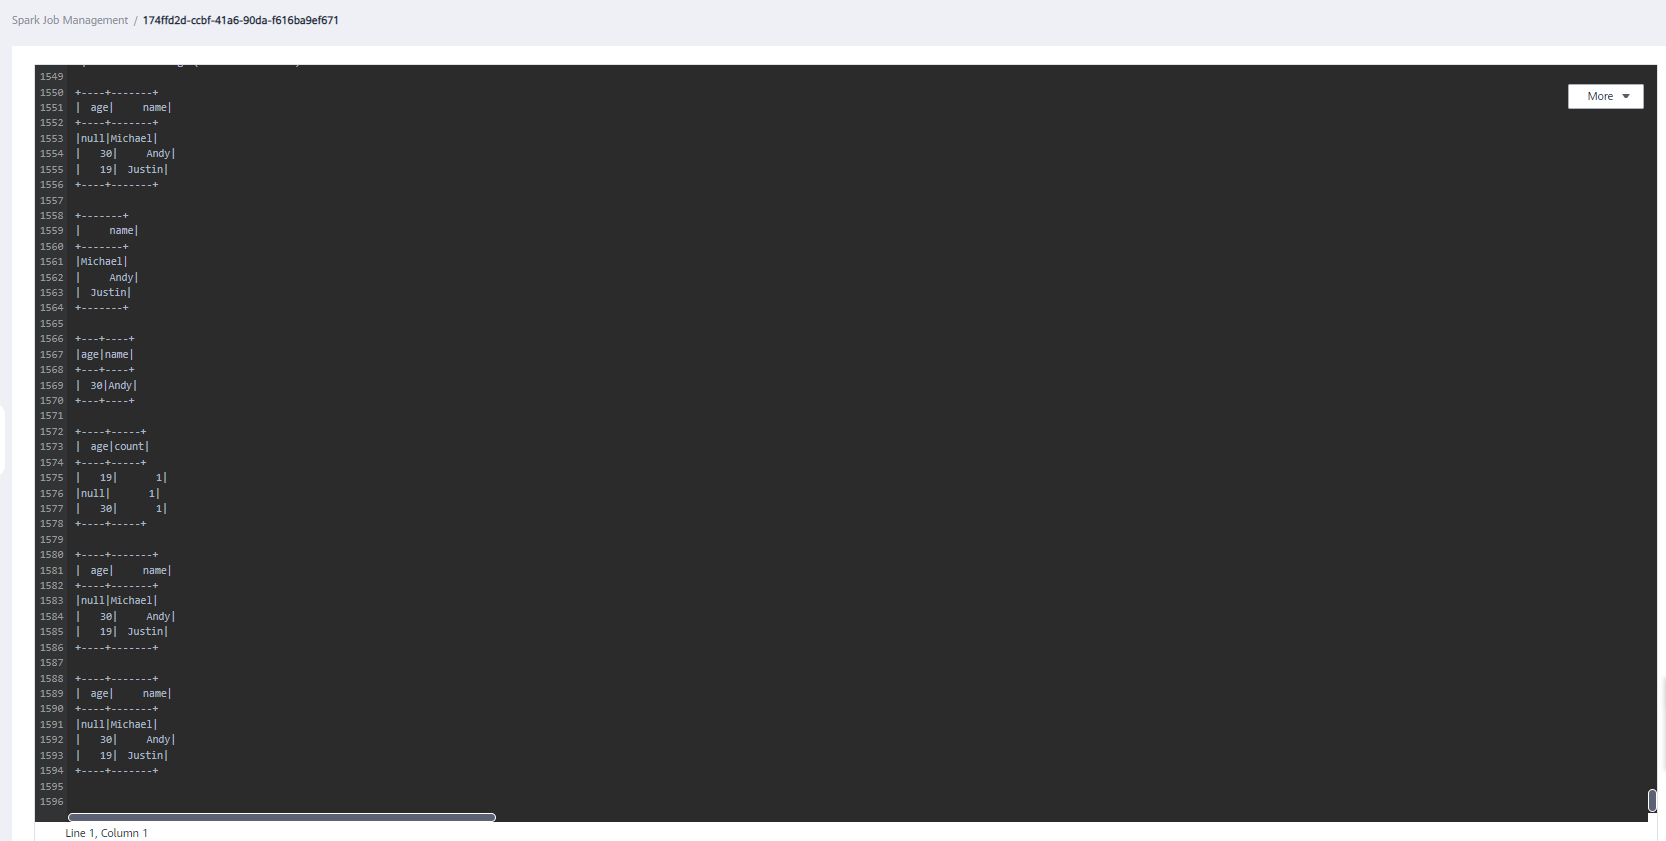
Figure 7 Driver logs
If the job is successfully executed, go to the result/parquet directory in the OBS bucket to view the generated parquet file.
If the job fails to be executed, choose More > Driver Logs in the Operation column to view the detailed error information.
For example, the following figure shows that when you create the Spark Jar job, you did not add the package path to the main class name.
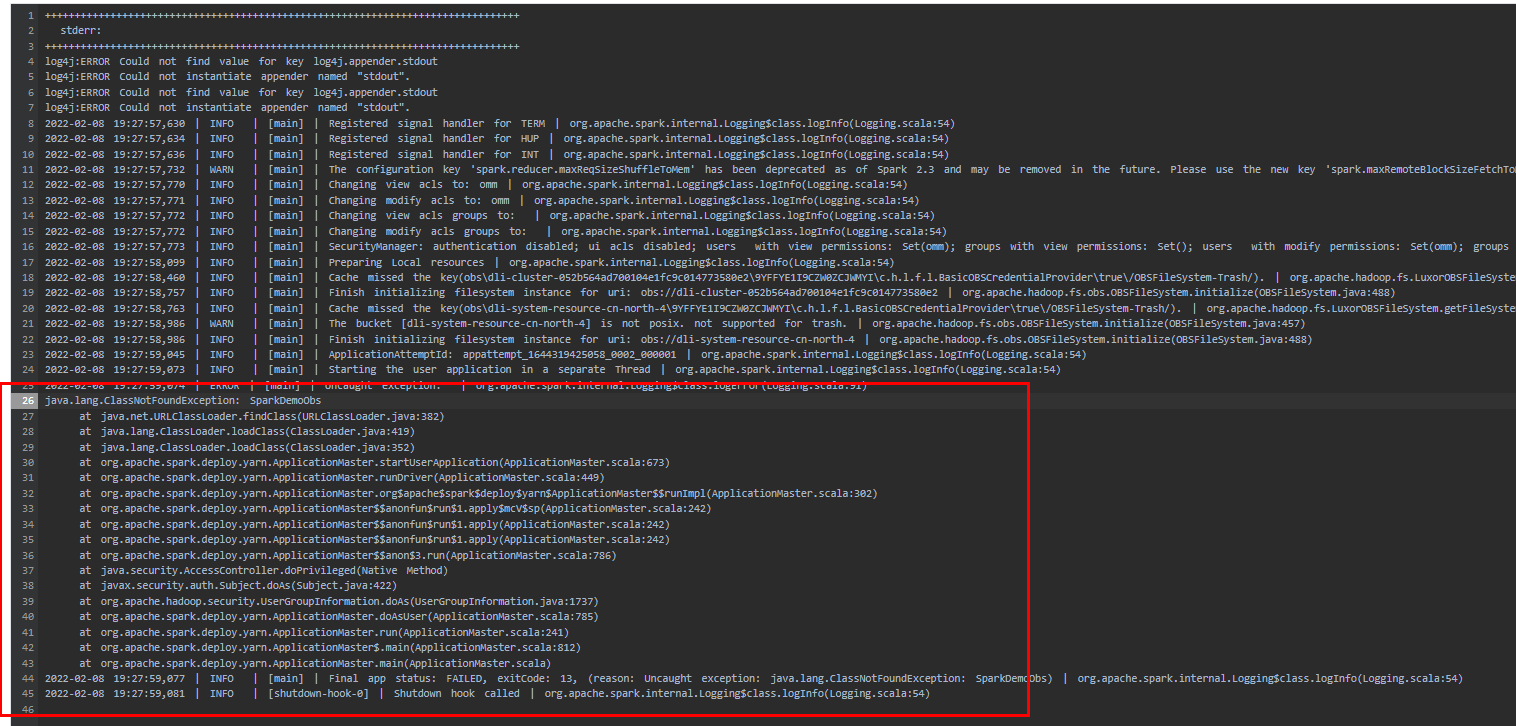
Figure 8 Error information
In the Operation column, click Edit, change the value of Main Class to com.SparkDemoObs, and click Execute to run the job again.
Sample Code
Note
Hard-coded or plaintext access.key and secret.key pose significant security risks. To ensure security, encrypt your AK and SK, store them in configuration files or environment variables, and decrypt them when needed.
package com.dli.demo;

import org.apache.spark.sql.Dataset;
import org.apache.spark.sql.Row;
import org.apache.spark.sql.SaveMode;
import org.apache.spark.sql.SparkSession;

import static org.apache.spark.sql.functions.col;

public class SparkDemoObs {
    public static void main(String[] args) {
        SparkSession spark = SparkSession
                .builder()
                .config("spark.hadoop.fs.obs.access.key", "xxx")
                .config("spark.hadoop.fs.obs.secret.key", "yyy")
                .appName("java_spark_demo")
                .getOrCreate();
        // can also be used --conf to set the ak sk when submit the app

        // test json data:
        // {"name":"Michael"}
        // {"name":"Andy", "age":30}
        // {"name":"Justin", "age":19}
        Dataset<Row> df = spark.read().json("obs://dli-test-obs01/people.json");
        df.printSchema();
        // root
        // |-- age: long (nullable = true)
        // |-- name: string (nullable = true)

        // Displays the content of the DataFrame to stdout
        df.show();
        // +----+-------+
        // | age|   name|
        // +----+-------+
        // |null|Michael|
        // |  30|   Andy|
        // |  19| Justin|
        // +----+-------+

        // Select only the "name" column
        df.select("name").show();
        // +-------+
        // |   name|
        // +-------+
        // |Michael|
        // |   Andy|
        // | Justin|
        // +-------+

        // Select people older than 21
        df.filter(col("age").gt(21)).show();
        // +---+----+
        // |age|name|
        // +---+----+
        // | 30|Andy|
        // +---+----+

        // Count people by age
        df.groupBy("age").count().show();
        // +----+-----+
        // | age|count|
        // +----+-----+
        // |  19|    1|
        // |null|    1|
        // |  30|    1|
        // +----+-----+

        // Register the DataFrame as a SQL temporary view
        df.createOrReplaceTempView("people");

        Dataset<Row> sqlDF = spark.sql("SELECT * FROM people");
        sqlDF.show();
        // +----+-------+
        // | age|   name|
        // +----+-------+
        // |null|Michael|
        // |  30|   Andy|
        // |  19| Justin|
        // +----+-------+

        sqlDF.write().mode(SaveMode.Overwrite).parquet("obs://dli-test-obs01/result/parquet");
        spark.read().parquet("obs://dli-test-obs01/result/parquet").show();

        spark.stop();
    }
}